How to Use This Template 🛠️
Estimated submission time: 30 minutes ⏰
This page includes the submission guidelines of SEA 2025 conference.
Create your Paper Repository
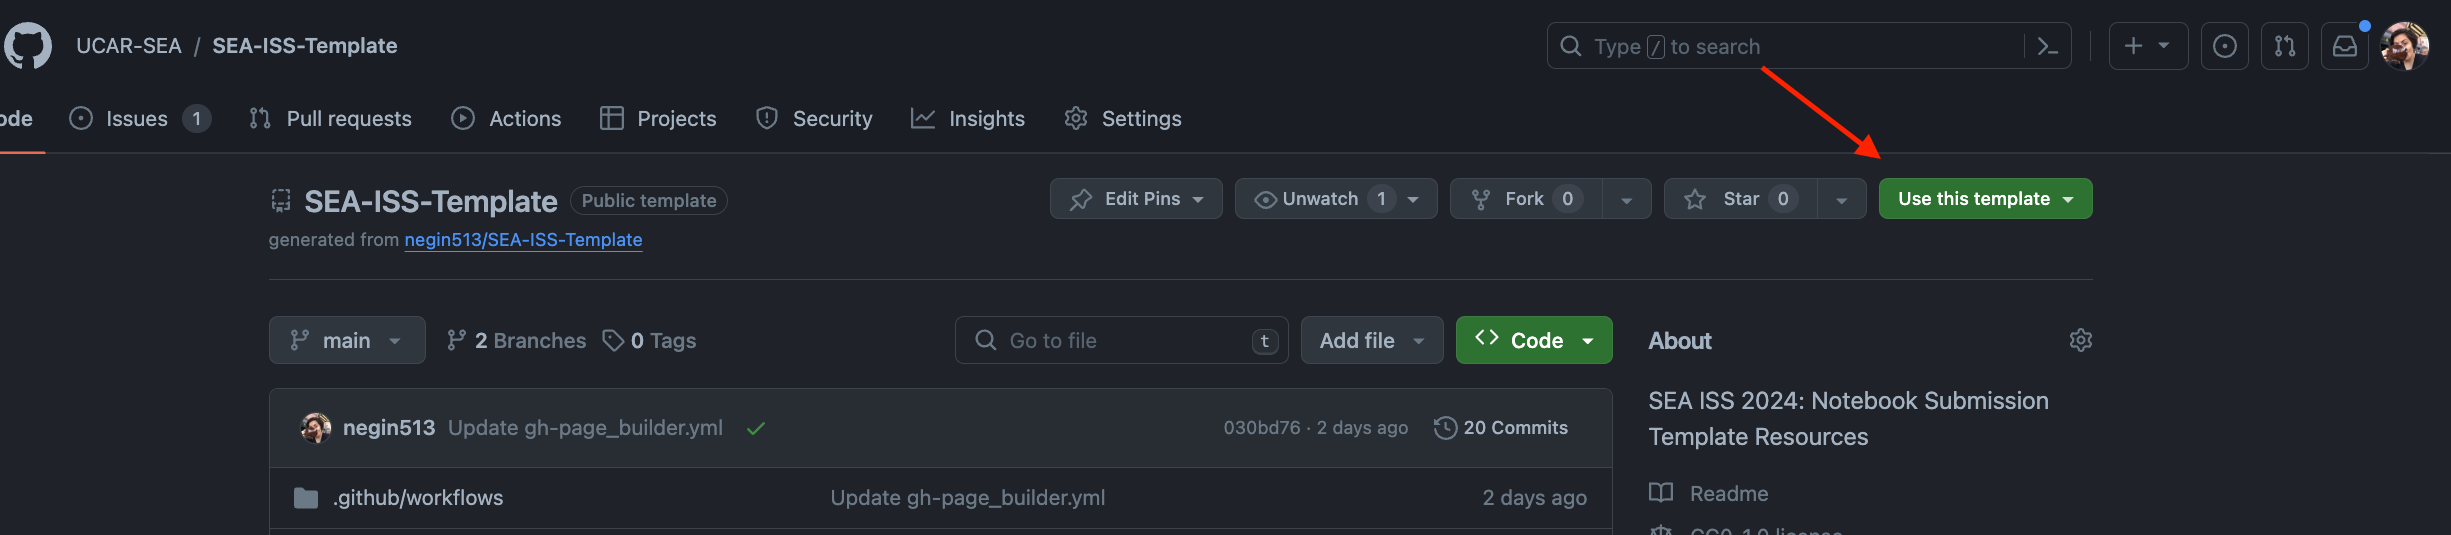
Create a New Repository Using this Template: Click on the “Use this template” button to create a new repository with the files from this template.
Note
If you want to learn more about Git and GitHub, you can check out the following tutorials:
Name your Repository: Name your repository using the following naming convention:
SEA-ISS-2025-<paper-title>. For example, if your paper title is “My Awesome Paper”, your repository name should beSEA-ISS-2025-My-Awesome-Paper.Activate GitHub Pages: Once you created your repository, go to the settings of your repository, scroll down to the “Pages” section, and under “Build and deployment” choose Source: “GitHub Actions”. This will allow you to view your Jupyter Book online. This will be automatically triggered when you push your changes to your repository. Once you activate this, you can view your Jupyter Book by clicking on the link provided in the “Pages” section of your repository settings. If you have any issues with this step, please reach out to the conference organizers.
Environment Setup: Update the
environment.ymlfile and add any additional packages you may require.Paper Information: Fill in the details of your paper in this
README.md, including the title, authors, abstract, and other relevant acknowledgements. At this step, don’t worry about the DOI badge, you will update this later.Add your Paper: Add your paper as Jupyter Notebooks or markdown files under the
notebooksfolder. You can use one notebook or multiple notebooks if you wish. You can also use markdown files if you prefer.notebooks/ |── introduction.md ├── notebook1.ipynb └── notebook2.ipynb
This framework supports the MyST Markdown language in Markdown and notebook documents. This allows users to write rich, publication-quality markup in their documents.
Example paper 1 and Example paper 2 are provided to help you get started. You can either organize all your content in 1 notebook (or markdown file) similar to this example or split it up into multiple notebooks (or markdown files) similar to the example 2.
Update the Table of Contents: Update the
_toc.ymlfile to include the notebooks you’ve added. Remove the extra examples from the_toc.ymlfile.Commit your changes: Commit and push your changes to your repository.
Check your Jupyter Book: Once you’ve pushed your changes, check that your Jupyter Book is building correctly. You can check the status of your Jupyter Book by clicking on the “Actions” tab of your repository.
Tip
Citations and Bibliography: For adding citations to your paper and referencing others, please see our detailed guidelines here. In short, after adding your references to your references.bib file, you can add the citation to your paper using the {cite}[authoryearkey] syntax.
Hint
If you are more comfortable using word or latex, you can convert your document to markdown using pandoc. To learn more about how to convert your word document to markdown, you can check out this tutorial.
If you have any questions or need help with your submission, please reach out to the conference organizers or open an issue in this repository.
Ready to Submit your Paper? 📝
Submit your Paper: Once you’ve completed the steps above, you can submit your paper to the conference organizers:
Once you are ready to submit your paper, go to the “Issues” tab of this repository and click “New Issue”.
Someone from the SEA committee will add your github username to the list of collaborators for the UCAR-SEA github organization.
Once you accepted the invitation, you can transfer your repository to the UCAR-SEA organization.
Navigate to the settings of your paper repository, scroll down to the Danger Zone, and click “Transfer” .
Select or type “UCAR-SEA” to transfer the repository to the conference organizers. This step will make your paper public and allow the conference organizers to review your paper.
Make Zenodo DOI for your paper
- : 1. Go to [Zenodo] and login with your GitHub account.
2. Click on your username in the upper right of Zenodo and select “GitHub”.
3. Find your paper repository in the UCAR-SEA org and switch Zenodo preservation to ON.
4. In GitHub, open your paper repository in the UCAR-SEA GitHub organization and click “Create a new release”. - Click the “Select tag” button and provide a version - probably v1.0.0 unless you have already created such a tag earlier (in which case, use the appropriate version for your new release). You can name the release using the version number as well (e.g., “v1.0.0 - Zenodo DOI”). Then, publish the release.
5. Back in Zenodo, you should now see a DOI for this release if you click on the repository. Click on the created DOI.
6. Click edit and make the following changes:
Change Resource type to “Publication / Conference proceeding”
Change the title to your paper title
Modify Creators to match those authors shown in the paper’s README
Replace the description with your abstract
Add your keywords from your paper
Add Conference information (Title: “2025 Improving Scientific Software Conference”, Acronym: “ISS25”, Place: “Boulder, CO”, Dates: “7-10 April, 2025” and Website: “https://sea.ucar.edu/iss/2025/”)
7. Feel free to add other relevant information as appropriate and then click “Publish”.
8. Finally, scroll down on the published record to the “Communities” section on the right. Click the gear icon and choose “Submit to Community” Search for “2025 Improving Scientific Software Conference Proceedings”, read the disclaimer and submit.
9. Update the DOI badge: Once you’ve created a new DOI for your paper, you can update the DOI badge in the README.md file of your paper repository with the new DOI.
Configure Binder for your paper:
Update or remove the Binder badge
For those who would like their papers to be easily launched in an executable environment based upon the specifications in the repository, you can update the Binder badge in the README.md to appropriately reflect your repository name and path to your notebooks. You can find more information about how this works on the My Binder website.
If your notebooks are not interative or you would rather not include this feature, simply remove the line for the Binder badge in the README.md file.
Tip
You can submit your paper as one notebook or split it up to multiple notebooks and markdown files. Please see the example paper1 and example paper2 for examples of how to structure your paper.
Note
Please reach out to the conference organizers or open an issue or a discussion in this repository if you have any questions or need help with your submission.